

Table of Contents
- Why Pipes Burst in Winter and the Warning Signs
- Step 1: Insulate Pipes in Unheated Areas
- Step 2: Seal Cracks and Gaps in Exterior Walls
- Step 3: Disconnect Outdoor Hoses and Shut Off Spigots
- Step 4: Keep a Consistent Thermostat Setting
- Step 5: Let Faucets Drip During Extreme Cold
- Step 6: Open Cabinet Doors to Circulate Warm Air
- Step 7: Use Heat Tape for High-Risk Pipes
- What to Do If a Pipe Freezes or Bursts
- DIY vs. Professional Intervention
- Frequently Asked Questions
Last Updated: September 9, 2026
Why Pipes Burst in Winter and the Warning Signs
A burst pipe is one of the most damaging home emergencies, often causing thousands of dollars in water damage in minutes. When water freezes inside a pipe, it expands, and the ice pressure can rupture the pipe wall. This is why learning how to prevent burst pipes in winter matters for every homeowner in cold climates.
Warning signs are subtle but identifiable. If a faucet only trickles, or you hear banging in your walls, ice is likely forming in the line. Frost on exposed pipes is another red flag. We’ve responded to countless emergency calls where a 15-minute inspection days earlier would have prevented the damage.
Pipe burst prevention follows a predictable playbook. Below are nine specific steps to protect your plumbing system, from insulating exposed lines to knowing when to call a professional.
Step 1: Insulate Pipes in Unheated Areas
Pipes in crawl spaces, attics, basements, and garages are the most vulnerable to freezing because they sit outside your home’s heated envelope. Insulating these lines is the single most effective measure you can take.
Measure your pipes, then purchase foam insulation that fits snugly. Slit the tube lengthwise, press it over the pipe, and seal the seam with foil tape. Pay special attention to elbows and joints, where heat loss is greatest.
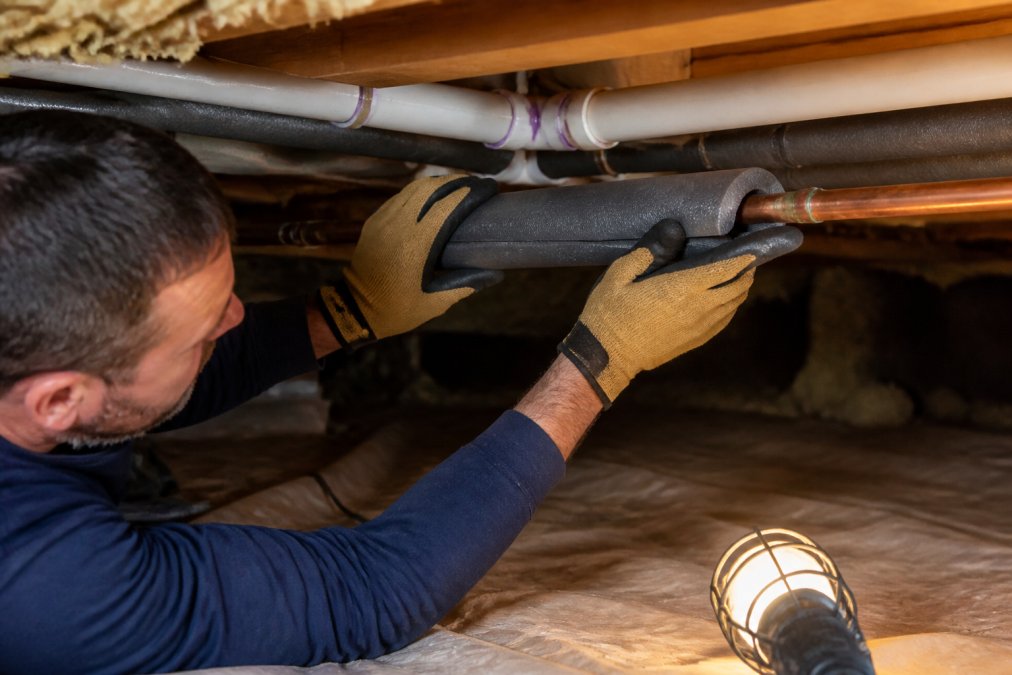
Best Pipe Insulation Materials for the Job
For most homeowners, polyethylene foam tubes are the practical choice: they cost little, slip on in minutes, and provide sufficient protection for moderately cold climates.
Fiberglass wrap suits high-heat areas near water heaters, though it requires careful handling. Rubber insulation offers superior durability and moisture resistance for outdoor or damp locations. Ensure the R-value matches your local climate, and avoid gaps between sections, which create cold spots where ice can form.
Check the insulation on pipes that run through kitchen and bathroom cabinets against exterior walls. These are easy to overlook because they’re hidden from view, yet they’re among the most common freeze points in a home.
Step 2: Seal Cracks and Gaps in Exterior Walls
Cold air doesn’t just surround your pipes; it finds its way through tiny openings in your home’s structure. Gaps around utility lines, vents, and electrical conduits let freezing air reach pipes that would otherwise stay warm.
Walk the exterior of your home and inspect every penetration point. Use expanding foam sealant or caulk to close gaps larger than a quarter-inch, and weatherstripping for smaller cracks. Inside the home, feel around outlet boxes and baseboards on exterior walls; if you sense a draft, seal those areas too. This step complements your insulation work, ensuring warm air stays where it belongs.
Step 3: Disconnect Outdoor Hoses and Shut Off Spigots
A garden hose left connected through winter is one of the fastest routes to a frozen pipe. Water trapped in the hose and the spigot freezes, expands, and can crack the fixture or the supply line leading to it.
Disconnect all hoses, drain them completely, and store them indoors. Close the shut-off valve that supplies outdoor spigots, if your home has one, then open the spigot to drain any remaining water. Leave the valve open through the winter. For homes without interior shut-off valves, install an insulated foam cover over the exterior spigot. Consider upgrading to frost-proof spigots, which are designed to drain water away from the freeze zone.
If you skip the interior shut-off step and only cover the spigot, water remains in the pipe leading to the fixture. In deep cold, that trapped water can freeze and burst the line inside your wall, causing damage you won’t notice until it thaws.
Step 4: Keep a Consistent Thermostat Setting
Lowering the thermostat during a deep freeze can cost far more than it saves. Maintaining a minimum indoor temperature keeps warmth circulating through walls and floors where pipes run. The real defense is a consistent thermal envelope, and modern smart thermostats make this easier than ever.
The Mechanics of Heat Loss
When the furnace cycles off, the air inside wall cavities cools. Pipes running through these cavities, especially on exterior walls, lose heat faster than room air can replenish it. A dramatic temperature swing creates a cycle of expansion and contraction that stresses pipe joints and fittings, so a steady, low setting is safer than a fluctuating one.
The 55°F Baseline and the ‘Degree-Day’ Effect
The 55°F rule assumes a reasonably well-insulated home. In an older home, 55°F in the living room might mean 40°F inside an exterior wall cavity on a 10°F night. If the outdoor temperature is predicted to drop below 20°F, consider raising your thermostat to 58°F or 60°F to maintain a safer margin inside the walls.
Smart Thermostats and Remote Sensors: The Modern Advantage
A standard programmable thermostat only reacts to the schedule you set. A smart thermostat (like those from ecobee, Nest, or Honeywell Home) offers two distinct advantages for burst pipe prevention:
- Remote Temperature Monitoring: Place a wireless temperature sensor in the coldest room, a basement, a crawl space, or a room above an unheated garage. The thermostat can alert your phone if the temperature in that zone drops below a critical threshold (e.g., 45°F), giving you hours of warning before a freeze event occurs.
- Geofencing and ‘Away’ Mode: Instead of turning the heat off when you leave for work, set the thermostat to ‘Away’ mode, which maintains a safe minimum (like 55°F) but prevents the furnace from running unnecessarily. More importantly, if you are on vacation and a cold snap hits, you can check and adjust the temperature from your phone in real time, preventing a disaster from hundreds of miles away.
The Cost-Benefit Calculation
The U.S. Department of Energy suggests you can save as much as 10% a year by turning your thermostat back 7°F-10°F for 8 hours a day (energy.gov). However, the average cost of a single burst pipe claim is over $10,000, according to the Insurance Information Institute. The risk of a $10,000 claim is not worth a few dollars in savings.
If you have a smart thermostat, create a ‘Freeze Alert’ routine. Set a rule that sends a push notification to your phone if the indoor temperature drops below 50°F. This is a proactive, automated safety net that a manual thermostat cannot provide.
The ‘Vacation’ Setting
If you’re leaving home for more than 24 hours during winter, do not turn the heat off. Set the thermostat to a consistent 55°F and take a timestamped photo of the setting. This photo documents that you maintained a reasonable heat level, which is critical evidence for an insurance claim, as many policies have a ‘reasonable care’ clause.
Step 5: Let Faucets Drip During Extreme Cold
The physics here is simple: running water is far less likely to freeze than standing water. When temperatures drop well below freezing, open one or two faucets to a slow, steady drip.
The drip relieves pressure in the plumbing system, which is critical because even a fully blocked pipe may not burst until pressure builds behind the ice. A pencil-thin stream is sufficient; you don’t need running water. Choose the faucet farthest from your main water valve, as this encourages water to move through the entire system. During the coldest nights, open both hot and cold taps slightly, since both lines are at risk.
Step 6: Open Cabinet Doors to Circulate Warm Air
Pipes under sinks are a common freeze point, particularly in kitchens and bathrooms on exterior walls. The cabinet enclosure traps cold air, while the wall behind it stays cold from outside temperatures.
Open cabinet doors during extreme cold events to let warm room air reach the pipes. If you have young children or pets, secure cleaning supplies out of reach first. For cabinets that are difficult to keep open, position a small fan to blow warm air toward the space. This simple step costs nothing and can be the difference between a working sink and a flooded kitchen.
Step 7: Use Heat Tape for High-Risk Pipes
For pipes that remain vulnerable after insulation, heat tape provides active protection. Heat tape is an electric heating element that wraps around the pipe and plugs into a standard outlet, maintaining a consistent temperature above freezing.
Choose between self-regulating tape, which adjusts its output based on pipe temperature, and constant-wattage tape, which heats at a fixed rate. Self-regulating tape is safer and more energy-efficient, making it the better choice for most homeowners. Follow the manufacturer’s instructions precisely, as improper installation can create fire hazards. Never overlap the tape on itself, and check that the product is rated for your pipe material. For high-risk installations, guidance from the Federal Emergency Management Agency recommends combining heat tape with proper insulation for maximum protection.
The most vulnerable pipes are those in unheated spaces with poor insulation. Prioritize your protection efforts there first, using foam insulation as the baseline and heat tape for pipes that remain at risk.
What to Do If a Pipe Freezes or Bursts
Despite your best efforts, pipes can still freeze during extreme weather. Acting quickly can minimize damage and reduce repair costs.
If you suspect a frozen pipe, open the affected faucet and apply heat to the pipe using a hair dryer or portable space heater. Start near the faucet and work toward the blockage, never using open flames. If you cannot locate the freeze point or the pipe has already burst, shut off your main water valve immediately and call a professional for emergency service.
For burst pipes, the priority order is: shut off the water, document the damage for insurance purposes, then call a licensed plumber. The Insurance Information Institute’s guide on winter home claims notes that documenting damage with photos before repairs begin makes the claims process smoother.
| Problem | First Action | Professional Help Needed? |
|---|---|---|
| Slow trickle from faucet | Open faucet, apply gentle heat | Only if flow doesn’t return |
| Visible frost on pipe | Apply heat from faucet toward freeze | If pipe is inaccessible |
| Water stain on ceiling/wall | Shut off main valve immediately | Yes, call emergency service |
| Audible banging in walls | Shut off main valve | Yes, likely burst pipe |
DIY vs. Professional Intervention
Many winterization tasks are well within a capable homeowner’s reach. Insulating exposed pipes, sealing gaps, and disconnecting hoses are straightforward weekend projects. However, the line between a smart DIY project and a costly mistake depends on risk assessment, accessibility, and the specific failure mode you’re trying to prevent.
The DIY Safe Zone: Low-Risk, High-Visibility Tasks
You should feel confident handling tasks where you can see the entire pipe and the consequence of failure is low:
- Insulating exposed pipes in open basements, crawl spaces, and attics.
- Installing foam covers on exterior spigots.
- Sealing air leaks around windows, doors, and utility penetrations.
- Disconnecting and draining outdoor hoses.
These tasks require no special licensing and the risk of making things worse is minimal.
The ‘Gray Zone’: When to Stop and Call a Pro
The trouble begins when pipes are hidden. You cannot insulate what you cannot see. If you suspect a pipe is freezing in a concealed location, DIY efforts like opening cabinets or dripping faucets are only temporary mitigation; the permanent fix is a job for a licensed plumber.
Clear criteria for calling a professional before a freeze event:
- Inaccessible Pipes: You have a history of frozen pipes in a wall or ceiling, but you cannot access the cavity to add insulation.
- Low Water Pressure: You notice a persistent drop in water pressure during cold snaps, which indicates a partial ice blockage deep in the line.
- Old or Deteriorating Pipes: Your home has galvanized steel or polybutylene pipes, which are more prone to corrosion and rupture than modern copper or PEX.
- Complex Layout: Your home has plumbing runs through unheated additions, garages, or attics that are not part of the main living envelope.
The Emergency Rule: Time is the Enemy
A burst pipe releases hundreds of gallons of water per hour. According to the Federal Emergency Management Agency (FEMA), a single inch of water can cause more than $25,000 in damage to a 2,000-square-foot home. In an emergency, the priority order is: shut off the main valve, then call a professional. Do not attempt to ‘thaw’ a burst pipe yourself. The rupture is already there; applying heat will only increase the flow of water.
Regional Climate Considerations: One Size Does Not Fit All
The DIY vs. Pro decision also depends on your climate zone. Strategies for a ‘prolonged sub-zero’ climate (like the Upper Midwest or New England) differ from those in an ‘occasional freeze’ climate (like the South or Pacific Northwest).
- Occasional Freeze Zones (e.g., Texas, Georgia): Homes here are often built on slabs with pipes running through uninsulated crawl spaces or exterior walls. Because freezing is rare, builders often skimp on pipe protection. A single 10°F night can cause widespread damage. In these zones, a professional pre-winter inspection is highly recommended, as the construction methods are not designed for deep freezes.
- Prolonged Sub-Zero Zones (e.g., Minnesota, Maine): Homes are typically built with pipes in conditioned spaces or with robust insulation. However, the risk is prolonged exposure. DIY insulation is often sufficient, but the stakes are higher if a pipe does freeze, as the ground may be frozen, making exterior repairs difficult.
The Professional Inspection: A Pre-Winter Checklist
A professional pre-winter inspection is a risk management tool. A licensed plumber can use thermal imaging to identify cold spots in walls and verify that your main shut-off valve is functional, a critical detail many homeowners overlook. Ask for a written report of specific risks, which is also valuable for your insurance file.
If you have a frozen pipe and you cannot locate the blockage within 10 minutes of applying heat, stop. Call a plumber immediately. The longer the ice sits, the higher the pressure builds behind it. A ‘wait and see’ approach is the most common cause of catastrophic failure.
The Bottom Line
DIY is for prevention; professional intervention is for diagnosis and emergency response. If you are unsure whether your home is at risk, err on the side of a professional assessment. An inspection typically costs under $200, a fraction of a single water damage claim.
Frequently Asked Questions
At what temperature should you let your faucets drip?
Start dripping faucets when the outdoor temperature is expected to drop to 20°F or below. A slow trickle is enough to keep water moving and relieve pressure. Focus on faucets connected to pipes in unheated areas or along exterior walls. Leave both hot and cold handles slightly open, since both lines can freeze.
What are the first signs of frozen pipes?
The most common sign is little or no water coming from a faucet when you turn it on. You might also hear a gurgling sound, notice frost on an exposed pipe, or detect unusual odors from a drain. Act quickly if you spot these signs. A frozen pipe can burst, so shut off the main water valve and call a plumber if you cannot thaw it safely.
Which pipes in a house are most prone to freezing?
Pipes in unheated areas are at highest risk. This includes basements, crawl spaces, attics, and garages. Pipes running along exterior walls or inside cabinets against outside walls also freeze often. Outdoor spigots and swimming pool supply lines are vulnerable too. Concentrate your insulation efforts on these locations first.
What should you do if a pipe bursts?
Shut off the main water valve immediately to stop the flow. Open all faucets to drain remaining water from the system. Then, call a licensed plumber right away for emergency repair. Take photos of the damage for your insurance claim before cleanup begins. Do not turn the water back on until a professional has inspected the pipes.
Preventing burst pipes requires attention to your home’s specific vulnerabilities, from unheated crawl spaces to exterior spigots. The steps above address the most common failure points, but every home is different. A professional inspection can catch issues you might overlook, and knowing who to call before an emergency strikes provides genuine peace of mind. Get started with Classic Plumbing Solutions and protect your home this winter with expert burst pipe prevention and repair services.
