

Table of Contents
- Early Warning Signs of a Hidden Water Leak
- How to Read a Water Meter for Leaks
- Water Leak Detection Tools for Homeowners
- Signs of a Slab Leak and What to Do Next
- Preventing Burst Pipes in Winter
- When to Call a Professional Plumber
- Frequently Asked Questions
Last Updated: September 14, 2026
Early Warning Signs of a Hidden Water Leak
A hidden water leak rarely announces itself (the EPA). It shows up as a faint hiss behind a wall, a warm spot on the floor, or a water bill that climbs while your habits stay the same. Learning how to detect hidden water leaks starts with reading those signals before they become structural damage. At Classic Plumbing Solutions, we have handled residential leak calls across the Roanoke Valley since 1980, and homeowners who catch problems early spend far less than those who wait.
Indoor Clues: Damp Patches, Discoloration, and Hissing Sounds
Damp patches on walls or ceilings are the most common indoor clue; paint that bubbles, peels, or darkens usually means moisture is escaping from a pipe behind the surface. Listen for a steady hiss near cabinets, baseboards, or the water heater closet, and treat a musty smell that returns after cleaning as hidden moisture feeding mold. If you notice any of these, shut off the nearest fixture and check again in an hour.
Outdoor Clues: Spongy Lawn and Green Patches
Outdoors, the ground tells the story first. A spongy patch of lawn, or a strip of grass greener than everything around it, often sits directly above a leaking service line. Walk your yard after a dry stretch and press a screwdriver into the soil; if it sinks easily in one spot, you have found seepage. Check near the outdoor spigot and along the path between the meter and the house.
Before you dig anything up, photograph the green patch and note its position relative to the water meter. That record shortens a professional’s diagnostic time and helps document the issue if you file a claim later.
How to Read a Water Meter for Leaks
The water meter test is the fastest way to confirm a silent leak. Shut off every fixture, appliance, and irrigation zone, then watch the meter’s flow indicator for two to three minutes. If the triangle or low-flow dial keeps spinning, water is moving somewhere it should not. This test separates a real plumbing problem from a billing error, and it costs nothing.
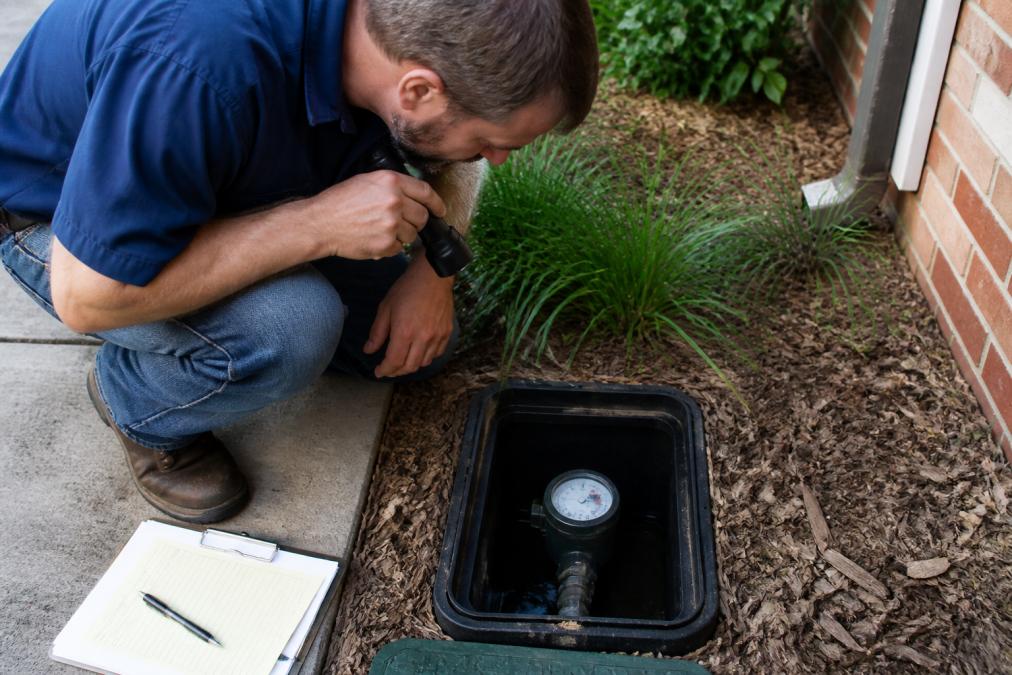
Follow this sequence:
- Turn off the main shut-off valve at the meter or where the supply enters the house.
- Close every faucet, ice maker line, and irrigation valve.
- Confirm the toilet flappers are seated and no cycle is running.
- Read the meter number, wait 15 minutes, and read it again.
- If the reading moved with everything off, the leak is on the pressurized side.
If the meter stops only when the main valve is closed, the leak sits between the meter and your home, usually the utility’s responsibility. Call the water utility with your readings before assuming it is yours to fix.
Water Leak Detection Tools for Homeowners
You do not need a full contractor’s kit to narrow down a leak. A few inexpensive tools answer most questions, and a moisture meter or infrared camera can confirm what your eyes miss. The goal is to locate the general area before anyone opens a wall.
| Tool | What It Finds | Best For | Cost Level |
|---|---|---|---|
| Moisture meter | Hidden moisture in drywall, wood | Interior wall checks | Low |
| Infrared camera | Temperature differences from escaping water | Ceilings, slab surfaces | Medium |
| Dye test kit | Toilet flapper and tank leaks | Bathrooms | Low |
| Leak sensor | Standing water at fixtures | Under sinks, water heater | Low |
| Pressure gauge | Water pressure irregularities | Whole-house diagnosis | Low |
| Smart leak sensor | Water at the source, with phone alerts | Under sinks, behind appliances | Low to medium |
| Automatic shut-off valve | Cuts the main supply on its own | Whole-house protection | Medium to high |
A dye test is the simplest starting point. Drop dye into the toilet tank, wait 15 minutes without flushing, and check the bowl; color means the flapper is leaking. Pipe corrosion and failing supply lines are the usual culprits behind slow, steady loss, and both show up under a moisture meter long before a stain appears.
Smart Home Leak Sensors and Shut-Off Valves
Smart leak sensors are the biggest upgrade most homeowners have not made yet. These small battery devices sit under sinks, beside the water heater, and behind the washing machine, and they alert your phone the moment they detect water. Paired with an automatic shut-off valve, the system closes the main supply on its own, limiting damage while you are away.
How the two pieces work together:
- The sensor is the trigger. It detects standing water at the fixture, not a leak inside a wall, so placement matters more than brand. Put one at every water source: under each sink, behind the refrigerator, near the water heater, at the washing machine, and beside the sump pump.
- The shut-off valve is the action. A motorized ball valve installs on the main supply line and closes when a sensor trips, when flow runs continuously past a set time, or when you tap a button in the app. Some models learn your normal water use and flag anomalies.
- The app is the record. Most systems log every event with a timestamp, useful when you file an insurance claim because it shows when the leak started and that you acted.
A common mistake is installing sensors only in the basement. Water damage usually starts at the fixture, so a basement-only setup misses the sink, toilet, and washing machine, the three most common sources. Another is skipping the shut-off valve: a sensor that only alerts you leaves the water running until you get home, while the valve actually stops the damage.
Choosing Between a Sensor and a Shut-Off Valve
If you can only do one, start with sensors at the highest-risk fixtures. They are cheap, install in minutes without plumbing work, and catch the slow drips that do the most long-term damage. Add the shut-off valve when you are ready to protect the whole house, especially if you travel or leave it empty for long stretches. If you have already had a water damage claim, most insurers view the valve as a meaningful risk reduction, and some offer a discount. Ask your agent before you buy so you know what documentation they want.
Change the batteries on the same schedule as your smoke detectors, and test each sensor with a wet cloth to the contacts. A sensor that has never been tested is one you cannot trust.
Before you buy a smart system, check whether your water meter is inside or outside the home and where the main shut-off valve sits. The valve installs on the main line, so you need to know which line is yours and whether the utility controls the shut-off at the meter.
A meter test confirms a leak exists; a moisture meter or infrared camera tells you roughly where. Smart sensors and an automatic shut-off valve keep a small leak from becoming a flooded floor while you are away. Use the manual tools to diagnose, and the smart tools to prevent.
Signs of a Slab Leak and What to Do Next
A slab leak is a pipe failure beneath your foundation, and it is the most expensive hidden leak to ignore. Because the pipe sits under concrete, you cannot see it, hear it clearly, or reach it without the right equipment. Modern detection can pinpoint the break with little or no cutting, so the goal is to confirm the leak and hand a professional a precise location rather than a guess.
How to Tell a Slab Leak From Ordinary Moisture
Not every warm floor or damp patch is a slab leak. A few patterns separate the two:
- Warm spots that stay warm. A hot-water line leaking under the slab heats the concrete above it. The spot stays warm even when the heat is off and does not track with sunlight or HVAC cycles.
- A running-water sound with everything off. If you hear water moving when no fixture, appliance, or irrigation zone is on, the flow is continuous and hidden.
- Cracks that appear and spread. Hairline cracks in tile, vinyl, or baseboards that widen over weeks point to soil movement from saturated ground.
- A meter that never stops. The meter test confirms continuous flow but not where, the slab leak’s signature.
- A musty smell with no visible source. Moisture wicking up through the slab feeds mold under flooring, which you smell before you see.
A single warm spot is not proof. Two or more of these together, especially with a spinning meter, is a strong signal.
Non-Invasive Detection Methods a Pro Will Use
You do not need to break concrete to find a slab leak. A licensed plumber works through a sequence, starting with the least invasive method and escalating only if needed:
- Acoustic listening. A sensitive ground microphone on the floor picks up the sound of pressurized water escaping the pipe. The loudest reading marks the likely break. Best on hot-water lines and quiet homes.
- Thermal imaging. An infrared camera reads temperature differences on the floor. A hot-water leak shows as a warm plume; a cold-water leak as a cool one. This narrows the area before any listening.
- Pressure isolation testing. The plumber isolates the hot and cold sides and pressurizes each separately. If the hot side loses pressure, the leak is on the hot line, which changes the repair and the cost.
- Electronic leak detection. Some pros use a line locator or tracer gas to follow the pipe path and confirm the break point, useful when the pipe route is unknown or has been rerouted.
- Video inspection. A small camera pushed through a cleanout or access point confirms pipe condition and rules out a blockage mimicking a leak.
A good plumber will tell you which method they plan to use and why before they start. Ask for the location in writing, not just a verbal ‘it’s over here.’
What to Do the Moment You Suspect One
- Shut off the main water valve immediately. Every minute of flow adds to the damage and the repair bill.
- Note every warm spot and crack with photos and rough measurements from a fixed point, like a wall or door frame.
- Run the meter test to confirm continuous flow, and write down the readings.
- Call a licensed plumber for non-invasive detection. Do not break into the slab yourself; you can damage the foundation, post-tension cables, or the pipe.
- Ask whether the repair will be a spot fix, a reroute, or a full repipe, and get it in writing before work begins.
Spot Fix vs. Reroute: What the Choice Means
Once the leak is located, you usually have two paths. A spot fix opens the slab at the break, repairs or replaces that section of pipe, and patches the concrete. It is cheaper up front but leaves the rest of the aging pipe in place, so a second leak is possible. A reroute abandons the under-slab line and runs a new pipe through the attic or walls to the fixtures. It costs more and involves more interior work, but removes the failing pipe from the equation. The right choice depends on pipe material, system age, and how many leaks you have already had. Ask your plumber to explain both options in plain terms before you decide.
Do not pour concrete or patch flooring over a repaired slab leak until the repair has been pressure-tested and the area is fully dry. Trapping moisture under a patch hides a failed repair and feeds mold.
A slab leak is confirmed by a spinning meter and located by acoustic listening or thermal imaging, not by digging. Get the location in writing, and choose between a spot fix and a reroute with your plumber’s input, not on price alone.
Preventing Burst Pipes in Winter
Burst pipes cause more water damage than any other single failure, and most are preventable. Water expands as it freezes, and the pressure splits the pipe even before the ice thaws (Essential Tasks After it Warms Up). Insulating exposed pipes in the attic, crawlspace, and garage is the first line of defense.
Keep these habits through cold snaps:
- Let a pencil-thin stream drip from the faucet farthest from the main valve on freezing nights.
- Open cabinet doors under sinks on exterior walls so warm air reaches the pipes.
- Disconnect garden hoses and shut off outdoor spigots.
- Keep the thermostat at a consistent temperature, day and night, even when traveling.
- Know where your main shut-off valve is and test that it turns.
If a pipe does freeze, never use an open flame to thaw it (redcross.org). A hair dryer or warm towels work safely, and if the pipe has already split, shut off the main valve and call for help.
When to Call a Professional Plumber
Call a professional when the meter test confirms continuous flow, when you cannot find the source within an hour, or when the leak is under a slab or inside a wall. These need non-invasive detection equipment and a licensed hand. A plumbing inspection also makes sense before buying a home or after any major water event.
Classic Plumbing Solutions sends drug-tested and background-checked technicians who provide upfront pricing and get your authorization before any work begins. Every repair is backed by a 3-Way Warranty on parts, labor, and services, so the fix stays fixed.
Documenting Damage for Insurance Claims
Water damage claims go smoother when the paperwork is ready before the adjuster arrives. Photograph every damp patch, stained ceiling, and damaged item, and keep the meter readings that proved the leak. Save receipts for emergency repairs and temporary lodging. Most policies require prompt reporting and loss prevention, so shutting off the water and drying the area counts in your favor. Keep a written timeline of when you first noticed each sign.
Do not throw away damaged flooring, drywall, or belongings before an adjuster inspects them. Discarding evidence can reduce or void your claim.
Frequently Asked Questions
How do plumbers detect hidden leaks?
Plumbers use non-invasive tools like acoustic listening devices, thermal imaging cameras, and pressure tests to pinpoint hidden leaks without tearing into walls. They may also perform a dye test on toilets and check the water meter. In Roanoke Valley, Classic Plumbing Solutions uses these methods to locate leaks behind walls or under slabs before any repair work begins, so you know exactly what you’re paying for.
How can I check my water meter for a leak?
Turn off every water fixture inside and outside your home, then locate your water meter and note the position of the flow indicator (the small triangle or dial). Wait 15 to 20 minutes without using any water. If the indicator moved, you likely have a hidden water leak. This simple meter test works for both indoor and slab leaks and costs nothing to try.
What are the most common signs of a hidden water leak?
Watch for damp patches on walls or ceilings, discolored paint, a sudden spike in your water bill, the sound of running water when nothing is on, and warm spots on the floor (a sign of a slab leak). Outdoors, a spongy lawn or unusually green patch can indicate a buried pipe leak. Catching these signs early prevents structural damage and mold growth.
Can I detect a leak behind a wall without professional equipment?
You can narrow it down using your water meter and by listening for hissing or dripping sounds, but confirming a leak behind a wall usually requires thermal imaging or acoustic detection equipment. If you suspect a leak, shut off your main shut-off valve and call a licensed plumber. Classic Plumbing Solutions offers leak detection with upfront pricing and a 3-Way Warranty on repairs.
A hidden leak left alone long enough will find its way into your foundation, your framing, and your insurance file. Classic Plumbing Solutions has served the Roanoke Valley since 1980 with 5-star rated repairs, an A+ BBB accreditation, and upfront pricing you approve before work starts. Financing is available, and seniors and military families receive special discounts. Get started with Classic Plumbing Solutions and stop the leak before it stops you. TAP TO CALL NOW.
